What Are the Pipes Behind My Bathtub? — Tub Waste & Overflow
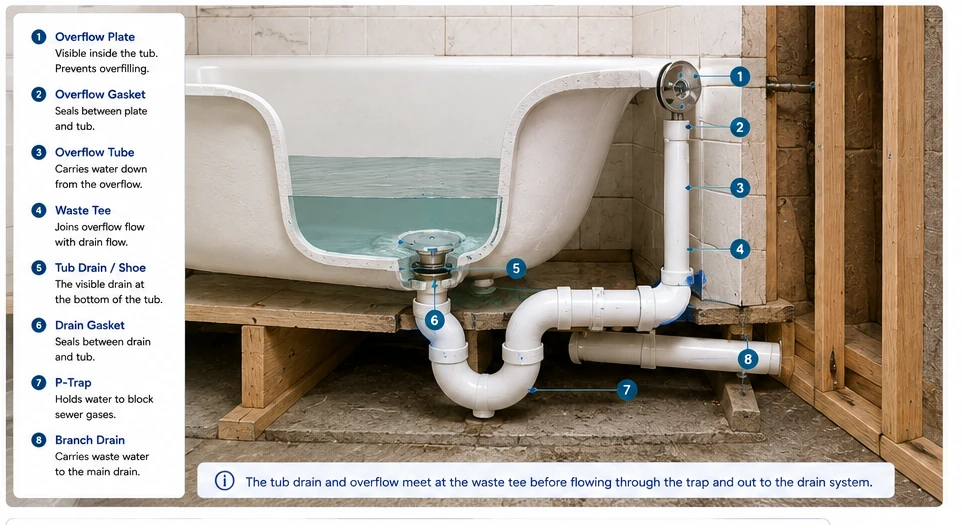
Most of a bathtub's drainage system is hidden behind and below the tub. The visible drain and overflow join into a waste assembly before water passes through the trap and into the branch drain.
SYSTEM + LEAK-ISOLATION CONCEPT — leak timing helps narrow the source but does not confirm a diagnosis.
When does the leak happen?
The timing does not prove the cause, but it can narrow what you inspect first.
Next action: isolate one condition at a time. Stop if water is actively reaching electrical components, causing significant damage, or the source cannot be safely accessed.
What You’re Looking At
See how the drain shoe and overflow join before the trap.
How It Works
Bathtub Drain & Overflow is shown as part of the larger plumbing path so a homeowner can see what connects before and after it. Use the visual to identify the component/system relationship first, then use symptoms and timing to narrow the problem.
Common Symptoms
- Unexpected leakage, noise, odor, slow flow/drainage, poor performance or visible deterioration
- A symptom that changes when a related fixture or valve is operated
Common Causes
- Wear, restriction, poor adjustment, failed sealing, incorrect layout or a downstream/upstream system issue
- A nearby component creating a symptom that appears to come from this part
Common Mistakes
- Replacing a part before confirming the failure path
- Changing piping before checking the surrounding system relationship
- Treating a simplified visual as a jurisdiction-specific installation drawing
What the Visual Shows
- Tub drain shoe
- Overflow opening and gasket area
- Overflow tube
- Waste tee
- P-trap below the tub
What You Can Check
- Identify the overflow and lower drain as separate test areas
- Do not assume water below the tub came from the visible drain flange
- Use controlled testing when the ceiling below is finished
Safety & Scope
Local plumbing codes and manufacturer instructions apply. Shut off water/energy where required and escalate concealed, sewage, structural, gas, electrical or uncontrolled-leak conditions.
When to Call a Plumber
Call a qualified plumber when the problem involves concealed piping, sewage, uncontrolled leakage, structural work, water-heater safety devices, uncertain code requirements, or multiple fixtures/system branches.